Calorique Twin heating cable mats electric floor heating 200 W/m² / 2,5 m²
CALORIQUE is a German brand whose name stands for modern, efficient electric heating products with the best price-performance ratio. Our heating cable mats are ready-made heating solutions that can be used as full or partial heating. Installation in new construction or renovation of old buildings is conceivably quick, easy and cost-effective.
Product advantages:
- Easy installation without special tools
- 15 years manufacturer warranty
- Low installation height (approx. 4 mm), fits in tile adhesive layer
- Can be embedded in screed or leveling compound
- Compatible with all adhesive floor coverings such as tile, stone, ceramic, etc.
- Also proper for retrofitting
- because of TWIN technology, there is only one connection cable, no return necessary
- CE certified
- no maintanance, free use
Easy installation:
The simple installation on a self-adhesive basis without special tools. The heating cable mat is embedded in the leveling compound for fixing or covered with the tile adhesive.
The power connection must always be carried out by an electrician!
Technical data
| Article |
Heating space
m² |
Mat size
m |
Rated power
W |
| T-Mat-200-1,0 |
1,0 |
0,5x2,0 |
200 |
| T-Mat-200-1,5 |
1,5 |
0,5x3,0 |
300 |
| T-Mat-200-2,0 |
2,0 |
0,5x4,0 |
400
|
| T-Mat-200-2,5 |
2,5 |
0,5x5,0
|
500 |
| T-Mat-200-3,0 |
3,0 |
0,5x6,0
|
600 |
| T-Mat-200-3,5 |
3,5 |
0,5x7,0 |
700 |
| T-Mat-200-4,0 |
4,0 |
0,5x8,0 |
800 |
| T-Mat-200-4,5 |
4,5 |
0,5x9,0 |
900
|
| T-Mat-200-5,0 |
5,0 |
0,5x10,0
|
1000 |
| T-Mat-200-6,0 |
6,0 |
0,5x12,0 |
1200 |
| T-Mat-200-7,0 |
7,0 |
0,5x14,0
|
1400 |
| T-Mat-200-8,0 |
8,0 |
0,5x16,0
|
1600 |
| T-Mat-200-9,0 |
9,0 |
0,5x18,0
|
1800 |
| T-Mat-200-10,0 |
10,0 |
0,5x20,0
|
2000
|
| T-Mat-200-12,0 |
12,0 |
0,5x24,0 |
2400 |
| T-Mat-200-15,0 |
15,0 |
0,5x30,0 |
3000 |
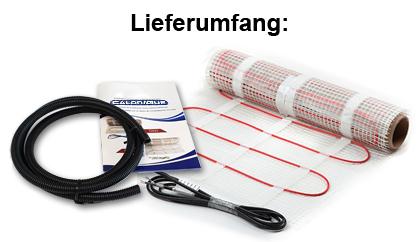
INCLUDED IN DELIVERY:
With each purchase, you will receive our Calorique Premium self-adhesive electric heating cable mat in the desired size, as well as a corrugated tube, which is ideal for installing an external temperature sensor of your thermostat. For the purpose of setting the floor and room temperature, we offer you several models of thermostats to choose from, from basic controllers to the sophisticated programmable thermostats with WLAN and app control. Contact us before you buy, we will be happy to advise you so that you make the right purchase decision.
Installation
Simple mounting technology (self-adhesive) does not require special tools. It is simply processed with an additional concrete-based adhesive (tile adhesive) in the heating surface for final fixation.
However, when laying the heating cable mat, including corrugated pipes, it must be ensured that the heating and connection lines do not overlap or cross. The power connection must always be carried out by an electrician!
The prescribed DIN-VDE standard for heating mats according to EVU conditions ensures a technical safety for the installation.
How to choose a right cable mat kit:
Calculate the area without fixed furniture and household appliances.
Choose the right kit based on the area to be heated.
Assembly Quick Start Guide:
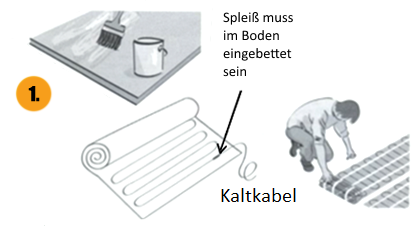
Draw a cable mat layout in your room. - Exclude areas where furniture or objects will be placed. Mark where to place a corrugated tube with a temperature sensor and a thermostat, if necessary.
Find a suitable place on the wall to mount the thermostat.
Chisel a groove in the wall for the cable. Make sure beforehand that there are no other lines in this area.
All work must be carried out in a de-energized state.
For possible additional thermal insulation, lay out a sufficiently insulating layer of pressed styrofoam.
Then place the cable mats on the screed, which has been previously applied smoothly and then dried and cleaned. Protect the heating elements from mechanical damage during the installation work, e.g. with suitable footwear, plywood boards and/or similar materials.
The temperature sensor is placed in a corrugated tube directly on the floor between the two heating pipes, approx. 50 cm from the wall.
Fix the corrugated pipe in the prepared channel with mortar or glue. Keep the cement from entering the pipe. After checking the free run for the sensor in the corrugated pipe, mark the position of the sensor on the floor.
For rooms with irregular shape, the heating mat design allows cutting the mesh without damaging the cable. It is more efficient to use a separate set for each room.
Measure the resistance of the heating mat to check for possible damage during the cable installation process.
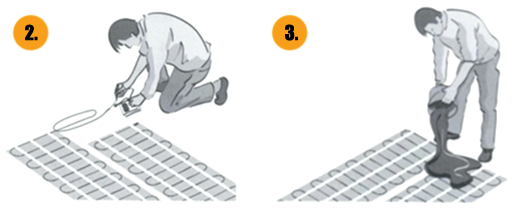
Connect the cable to the thermostat, according to the layout as indicated in the description; then fix it in the ground with a layer of mortar.
Lay a layer of adhesive compound suitable for underfloor heating over the heating system as a basis for the tiles. Measure the resistance of the heating cable again.
Place tiles or other material on the dry base. Turn on the heating only after the adhesive or mortar is completely dry. When starting the warm floor system for the first time, the warm-up time may be 5 to 48 hours.
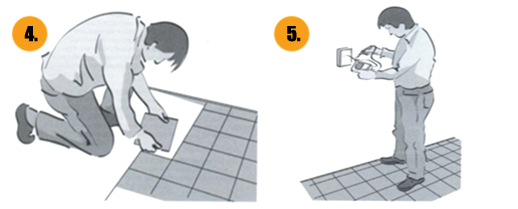
Measure the resistance of the heating cable again after the ground has dried out.


